The S1 plus, FlowQ hub, and FlowQ 3D print farm manager software user interface in the background The S1 plus, FlowQ hub, and FlowQ 3D print farm manager software user interface in the background

Plug-and-Play-System

In wenigen Minuten startklar

Keine Firmware-Änderungen, kein Code, nur ein paar Klicks

Jetzt starten - Kostenloser Plan

Einrichtung Anforderungen

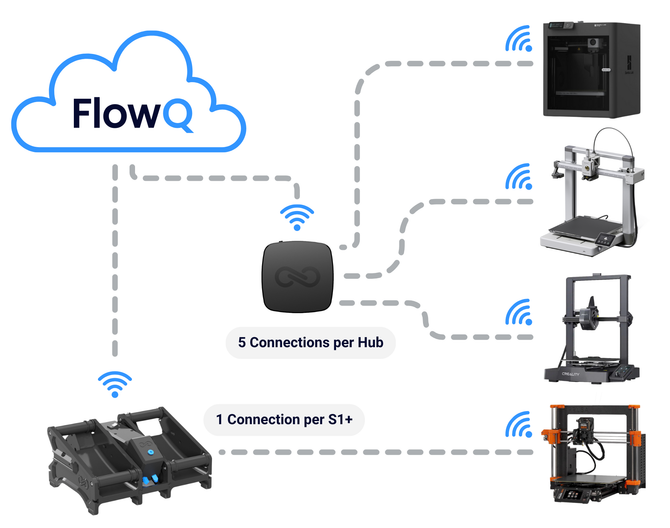
Verbinden Sie sich über S1+, Hub oder Ihren Computer via FlowQ Connect mit Ihrem 3D-Drucker.

Konto erstellen

FlowQ Tunnel (Hub, S1+ oder Computer)

Verbinden Sie Ihren 3D-Drucker mit einem S1+-Hub oder einem Computer mit FlowQ Connect.

Jetzt Tunnel shoppen

Kompatible 3D-Drucker

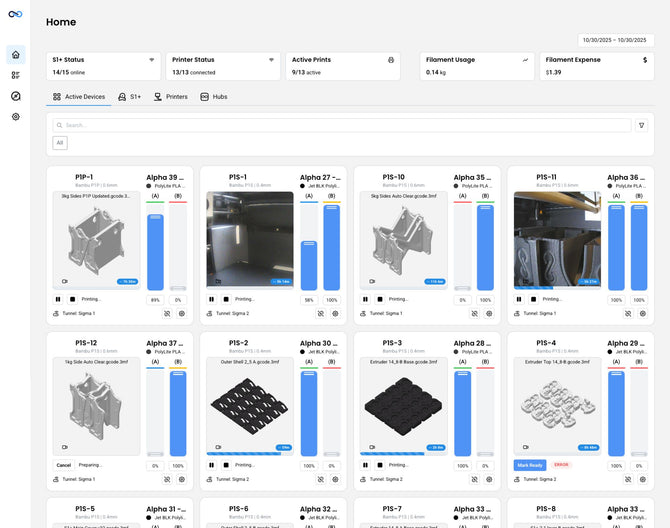
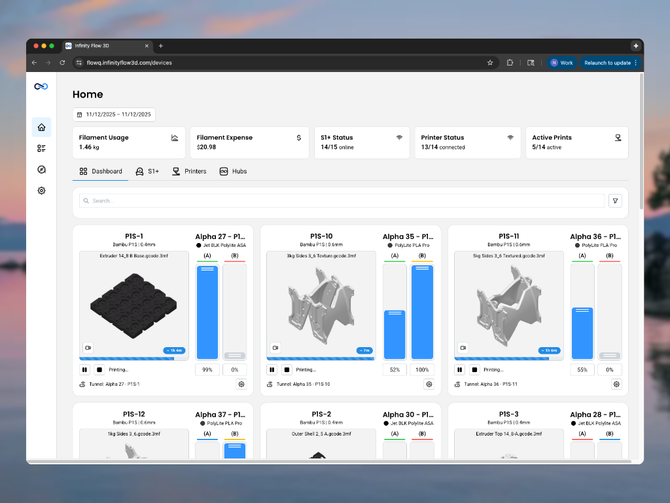
FlowQ unterstützt gemischte Druckerflotten. Verwalten Sie alle unterstützten Drucker über ein einziges Dashboard.

Siehe kompatible 3D-Drucker

FlowQ-Konto

Melden Sie sich bei FlowQ an und verbinden Sie Ihre 3D-Drucker. Keine Kreditkarte erforderlich.

Erste Schritte

So richten Sie FlowQ ein

Eine einfache, sichere Einrichtung, die typischerweise weniger als 5 Minuten in Anspruch nimmt.

Konto erstellen
Computer screen displaying FlowQ, a 3D printing software interface with print jobs and status.

Schritt 1: Konto erstellen

Sie können FlowQ komplett kostenfrei nutzen – keine Kreditkarte erforderlich. Alle Warteschlangen- und Automatisierungsfunktionen sind im kostenlosen Plan enthalten.

Die Nutzungslimits des kostenlosen Plans werden jeden Monat zurückgesetzt.

Loslegen – Kostenloser Plan
Computer screen displaying FlowQ, a 3D printing software interface with print jobs and status.
InfinityFlow 3D printing FlowQ Hub kit including a box, Hub, USB cable, and power adapter on a wooden surface.

Schritt 2: Eine Verbindungsmethode einrichten

Verbinden Sie einen S1+ FlowQ Hub mit Ihrem lokalen Wi-Fi-Netzwerk oder verwenden Sie Ihren Computer mit FlowQ Connect.

ℹ️ Wi-Fi-Anmeldeinformationen werden lokal auf dem Gerät gespeichert und niemals der Cloud oder dem Internet zugänglich gemacht.

FlowQ Connect verwenden

Einen FlowQ Hub verbinden

Einen S1+ verbinden

InfinityFlow 3D printing FlowQ Hub kit including a box, Hub, USB cable, and power adapter on a wooden surface.
A gif of Uploading a file to FlowQ, a 3D printer fleet management app, to be used across all printers in a print farm.

Schritt 3: 3D-Drucker verbinden und Druckdateien hochladen

Verbinden Sie einen 3D-Drucker, indem Sie dessen lokale IP-Adresse und alle erforderlichen Anmeldeinformationen eingeben.

Laden Sie Ihre geslicten Druckdateien in das zentrale Dateisystem von FlowQ hoch.

Dateien werden bei Bedarf automatisch an die Drucker gesendet und auf all Ihren Maschinen geteilt.

Alle Anleitungen anzeigen
A gif of Uploading a file to FlowQ, a 3D printer fleet management app, to be used across all printers in a print farm.
Adjusting the central print queue in FlowQ, a print farm management software

Schritt 4: Druckwarteschlange erstellen & mit dem Drucken beginnen

Erstellen Sie eine Druckwarteschlange und starten Sie den Druckvorgang über Ihren gesamten Bestand.

Richten Sie Druckwiederholung und automatischen Neustart für Drucker mit Druckausgabesystemen ein.

Integrieren Sie sich in über 8.000 Apps über Zapier, Make und die flowQ API, um benutzerdefinierte Workflows zu erstellen, wie z. B. das Hinzufügen von Druckaufträgen zur Warteschlange, wenn eine Online-Bestellung eingeht.

Alle Anleitungen ansehen
Adjusting the central print queue in FlowQ, a print farm management software

Optimieren Sie Ihre 3D-Druckfarm

Von Betreibern von Druckfarmen geschätzt, die eine einfachere, zuverlässigere Methode für die Produktionssteuerung suchen.

Jetzt starten

Häufig gestellte Fragen

Antworten auf einige unserer häufigsten Fragen.

What is a printer connection?

A printer connection is any 3D printer that is both:

  1. Registered to your FlowQ account, and
  2. Connected to a FlowQ Tunnel (such as a FlowQ Hub or S1+).

You can register unlimited printers to your FlowQ account. However, only printers that are actively connected to a Tunnel count as printer connections and can be controlled through the FlowQ dashboard.

If a printer is registered but not connected to a Tunnel:

  • You will not be able to start prints from FlowQ
  • The printer will appear Offline
  • It will display the label “No tunnel selected”

You can switch which printers are connected to a Tunnel at any time inside your account. This allows you to manage and control only the printers you actively want connected to the cloud, while keeping others registered but inactive. Connecting a printer is as simple as selecting a tunnel from a drop down menu.

What is a print job?

A print job is counted any time a print is successfully started on a 3D printer from your FlowQ account.

Print job usage resets on the first day of every month for users on the Free or Basic Plan.

If you reach your monthly print job limit, FlowQ will pause your queue and will not send the next job to a printer until your usage resets.

If a print is stopped before completion, it may still count toward your monthly print jobs if it successfully started and began printing. However, jobs that never begin printing — such as failed uploads or printer-side errors that prevent the print from starting — are not counted.

You can view your complete print history at any time from the FlowQ dashboard to see all jobs started from your account.

Can FlowQ handle automatic print ejection systems?

Yes. FlowQ is designed to integrate seamlessly with automatic ejection setups. You can queue multiple jobs back-to-back or setup loops for continuous, unattended printing.

What can I control remotely?

All FlowQ features are fully accessible from anywhere in the world.

Just log into your account to view live printer status, manage print queues, and control jobs remotely without needing to be on the same Wi-Fi network.

Every FlowQ tunnel creates a secure, encrypted connection to the cloud, so you get complete access to your print farm from any device, wherever you are.

Is the cloud connection secure?

FlowQ is proudly developed and hosted in the United States with security built into every layer.

All data is protected with end-to-end encryption, meaning information traveling between your printers and the FlowQ cloud is fully encrypted during transmission.

We also use encryption at rest, so any data stored in our databases remains secured even when not in use. This dual-layer approach ensures that print data, device credentials, and user information are always protected against unauthorized access.

Additionally, all Wi-Fi credentials are stored locally on your device tunnels and are never uploaded or stored in the cloud, ensuring complete protection of your network details.

Can I view my S1+ app data in FlowQ?

Yes. The S1+ app is being fully merged into FlowQ, and all existing S1+ features will be available inside FlowQ with a cleaner, faster, and more intuitive interface. You’ll be able to view and manage your S1+ data directly from the FlowQ dashboard.

No paid subscription is required to access any features previously available in the S1+ app. You can also register devices, add printers, create filament profiles, track filament usage, and explore the full dashboard without a subscription. A paid plan is only required if you want to connect printers to the cloud (necessary to for most 3D Printer related functionality).

Is there a free trial for FlowQ?

You can get started completely free using the FlowQ Free Plan — no credit card required. You can create an account, access the full dashboard, add printers, register tunnels, and start starting up your dashboard at no cost.

If you need higher usage limits than the free plan offers, you can upgrade at any time. FlowQ is designed to scale with you — start free, upgrade when you’re ready.

Will the S1+ app and FlowQ be combined?

Yes. The S1+ app is being fully merged into FlowQ to create one unified platform.

All features from the S1+ app — including filament tracking, device management, and remote monitoring— will be available directly inside FlowQ with a faster, more intuitive interface.

And importantly, every feature that was previously free in the S1+ app will remain free forever. Once merged, you’ll be able to access everything from a single dashboard with improved performance, reliability, and usability.

How much does FlowQ cost?

You can start using FlowQ completely free — no credit card required. You can create an account, access the full dashboard, add printers, register devices, and start organizing your setup at no cost.

If you need higher usage limits than the free plan offers, you can upgrade to any of our paid plans at any time. More details can be found here.

What makes FlowQ unique?

FlowQ was built from real-world print farm experience in our high output production environment.

It combines automation, monitoring, and queue control into one intuitive platform. No local servers, no complex setup, and powerful features that stay simple to use.

It’s effortless to setup, free to get started, and easily expandable as your print farm grows.

Can I use FlowQ with Shopify Flow?

Yes.

FlowQ can be integrated with Shopify Flow by using the FlowQ Open API together with HTTP request actions in Shopify Flow.

This allows you to automate actions based on Shopify events such as:

  • New orders
  • Order line items
  • Inventory changes
  • Fulfillment updates
  • Custom Shopify workflows

For example, you can automatically enqueue print jobs in FlowQ when an order is placed or updated.


Important note about Shopify plans:

Sending HTTP requests directly from Shopify Flow is limited by Shopify plan level. On plans where HTTP requests are not available, third-party Shopify apps can be used to send HTTP requests from Flow, allowing FlowQ automations to work on the Shopify Basic plan as well.


This makes it possible to build FlowQ-powered print automations on nearly any Shopify setup.