


Overview
The FlowQ Shopify integration connects your Shopify store directly to your FlowQ print farm. Once it's linked, FlowQ receives new Shopify orders in real time via webhooks, matches each line item to a print file you've mapped, and (if you want) drops the right number of copies straight into your print queue. That removes the manual loop of opening every order, finding the right file, and adding it to the queue yourself.
It's built for shops that print made to order and want the print queue to mirror what's actually selling.
How It Works
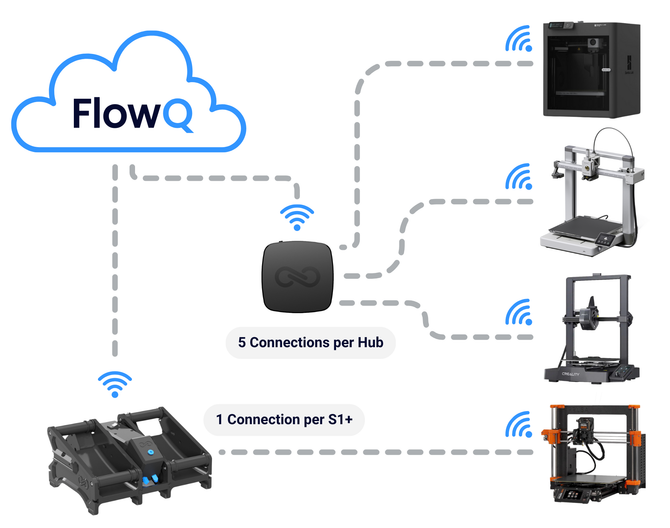
The integration runs on three pieces working together:
-
- Connection. You authorize FlowQ to read your Shopify store through Shopify's standard OAuth login. Order webhooks are registered automatically so new orders flow in instantly.
- Mappings. Each Shopify product variant is linked to one or more print files in FlowQ, with a per-unit quantity and a filament profile for each file.
- Settings. A toggle controls whether matched orders auto queue, and you can see webhook status and your connected store at a glance.
When a new Shopify order comes in, FlowQ looks up each line item's variant in your mappings. If a mapping exists and auto-queue is on, every print file attached to that mapping is added to the queue, with the per-unit quantity multiplied by the order quantity. If a mapping is missing, the order is pulled in and held for manual review instead.
Setting Up the Integration
1. Open the Apps Hub
From the FlowQ sidebar, open the Apps page. This is the central hub for every FlowQ integration, including Shopify, Etsy, Zapier, Make, and any custom apps.

2. Connect Your Shopify Store
Click into the Shopify tile to open the integration page, then click Connect Shopify store. You'll be sent through Shopify's standard OAuth flow to authorize FlowQ. Once you approve access, you're returned to FlowQ with the connection live and order webhooks registered.

3. Confirm the Connection
After connecting, the Overview tab shows your live connection status, the linked store domain, and recent order activity. Use Sync recent orders to pull the latest orders from Shopify at any time.

Mapping Variants to Print Files
Mappings tell FlowQ what to print when an order for a given Shopify product variant comes in. Without a mapping, FlowQ has no way to know which file an order corresponds to.
Open the Mappings tab to see every Shopify variant tied to a FlowQ print file, along with the SKU, filament profile, and per-mapping auto queue setting.

Adding a Mapping
Click Add mapping to link a Shopify variant to its print file (or files). For each mapping you set:
-
- Shopify variant: the product (and variant, if applicable) you're mapping.
- Print file(s): one or more FlowQ files that should be queued when this variant sells. A single variant can be tied to multiple print files, which is useful for multi-part products where the variant is one SKU but the order ships as several prints.
- Quantity per unit: how many copies of each print file to queue per unit ordered. This is set per file, so a multi-part product might queue one of File A and two of File B for every unit sold.
- Filament: the filament profile FlowQ should match when routing each job. Toggle Use print file default filament to fall back to the file's saved profile.

Repeat this for every Shopify variant you want FlowQ to handle. Variants without a mapping still show up in FlowQ, they just won't auto queue.
Settings
The Settings tab controls how the integration behaves shop wide and shows the health of your connection.

-
- Auto-queue orders. When on, new Shopify orders that match a mapping are added to the print queue automatically. When off, orders are still pulled in, but you add them to the queue manually from the Overview.
- Shop connection. Shows your linked Shopify store with a quick link to open the Shopify admin in a new tab.
- Order webhooks. Shows whether real-time order webhooks are active. Webhooks are what let FlowQ react to new orders the moment they're placed instead of polling on a schedule.
The Workflow
-
Shopify fires a webhook to FlowQ the moment a new order is placed.
-
Each line item is looked up against your Mappings.
-
If a mapping exists and Auto-queue orders is on, every print file linked to that mapping is added to the queue, with each file's per-unit quantity multiplied by the order quantity.
-
If a mapping is missing, the order is held on the Overview tab for you to review and queue manually.
-
From there, FlowQ's normal queue logic takes over. Routing to compatible printers, looping, and auto-restart all work the same way they do when you queue files manually.
Disconnecting
You can disconnect the Shopify store at any time from the integration page. Disconnecting stops new orders from being pulled in and removes the order webhooks from your shop, but leaves your existing mappings in place, so you can reconnect later without rebuilding them.

)