


Overview
As your print farm grows, manually turning e-commerce orders into print jobs quickly becomes a bottleneck. Each order requires checking line items, confirming quantities, finding the correct files, and adding them to the queue—slowing fulfillment and increasing the risk of mistakes like wrong files, incorrect quantities, or missed orders.
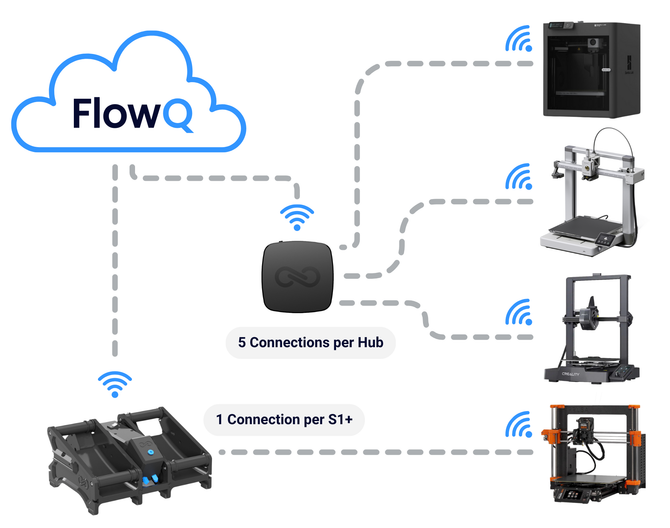
In this guide, you’ll learn how to build a Zapier automation that automatically adds print files to your FlowQ Queue as soon as a Shopify order is placed. Orders move directly from checkout to production, keeping your printers running without constant manual oversight.
The automation works by:
-
- Detecting a new order in Shopify
- Looping through each product in the order
- Matching product SKUs to predefined print files
- Calculating the correct number of prints required
- Adding those prints to your FlowQ Queue with consistent, repeatable settings
While this guide focuses on Shopify, the same workflow can be used with other e-commerce platforms. Zapier supports thousands of apps—including WooCommerce, eBay, and Amazon Seller tools. To adapt this flow, simply swap the Shopify trigger for another order-based trigger. The rest of the Zap remains largely unchanged.
Requirements Before You Start
Before building this Zap, make sure you have the following:
1. FlowQ Zapier App (Private Beta)
To use FlowQ with Zapier, you must install the private beta version of the FlowQ Zapier app.
How to install it:
-
-
-
- Click the invite link provided at the top of this guide
- Log in to Zapier
- Click Accept Invite
-
-
The FlowQ app will now be available when adding Zap actions.
2. Paid Zapier Plan
Shopify is a premium Zapier app, which means:
-
-
-
- You must be on a paid Zapier plan or Free Trail
- Free plans may not work for this automation
-
-
3. Google Sheet for SKU Mapping
You’ll need a Google Sheet that maps Shopify SKUs to FlowQ print files. You can download a template using the link at the top of this guide.
Required columns:
-
-
-
- SKU – Matches Shopify product SKU
- File ID – FlowQ Print File ID
- Iterations Per Unit – How many print iterations per item ordered
-
-
This sheet allows you to change print behavior without editing the Zap.
Step-by-Step Zap Setup
Step 1: Shopify Trigger — New Order
- Create a new Zap
- Set the trigger app to Shopify
- Select New Order as the trigger
- Connect your Shopify store
- Test the trigger using a real order you want to send to production.
This order will be used throughout the Zap for testing.

Step 2: Loop Through Line Items
Since orders can contain multiple products, we need to loop through each line item.
- Add an action: Looping by Zapier
- Choose Create / Loop From Line Items
- Set Values to Loop:
-
- SKU → Shopify line item SKUs
- SkuQty → Shopify line item refundable quantity
This ensures the Zap runs once per product in the order.

Step 3: Look Up Print Files in Google Sheets
Now we match each SKU to its print file and iteration count.
- Add an action: Google Sheets
- Select Lookup Spreadsheet Row
- Connect your Google Sheet
- Configure:
-
- Spreadsheet → Your SKU mapping sheet
- Lookup Column → Select "SKU" from dropdown
- Lookup Value → SKU (from Loop step)
- Successful if no result found → False
- If multiple rows are found → Return first
You should see the correct File ID and Iterations Per Unit.

Step 4: Calculate Total Iterations
Now we calculate how many total prints to add to FlowQ.
- Add an action: Formatter by Zapier
- Choose Utilities → Perform Math Operation
- Configure:
-
- Operation → Multiply
- Input 1 → Iterations Per Unit (from Google Sheets, e.g. Row COL F)
- Input 2 → VarQty (from Loop step)
The output should be the total number of prints required.

Step 5: Add Prints to the FlowQ Queue
This is where the automation becomes production-ready.
- Add an action: FlowQ
- Select Add Print to Queue
- Configure:
-
- File ID → Google Sheets File ID (e.g. Row COL D)
- Iterations → Formatter output
- Infinite → False

Recommended Settings
We strongly recommend the following defaults:
-
-
Sticky → True
- Keeps the job at the top of the queue until all iterations finish
-
Override → True
- The file will be re-uploaded and override any existing file with the same name to prevent outdated versions from printing.
-
Auto-Start Next Print → False
- Unless every file includes fully tested auto-clearing G-code
-
Sticky → True
ℹ️ Advanced users may map Auto-Start to a Google Sheet column per file.
Testing & Validation
Before relying on this automation:
- Place a test Shopify order
- Confirm: The Zap runs without errors, the correct print file is added, & iteration count matches expectations
- Verify the job appears correctly in the FlowQ Queue
- Repeat with a multi-item order
Once verified, this automation can safely run unattended.
