


Overview
Want to make your Bambu A1 automatically push off finished prints and get ready for the next job? With just a few lines of G-code, you can enable automatic bed clearing on your A1 — no sensors, servos, or mechanical add-ons required. This free and easy modification uses the printer’s existing motion to sweep parts off the bed after each print, helping you print back-to-back with less downtime and more reliability.
![]()
In this guide, we’ll walk you through how to:
- Modify your Bambu Studio end G-code
- Add a simple bed scraping sequence
- Test and fine-tune your setup for reliable part ejection
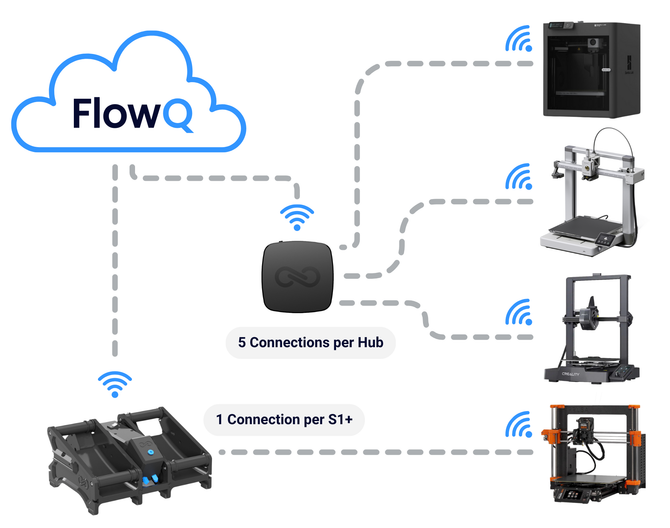
Whether you’re running a single printer or building out a mini print farm, auto-clearing is a key step toward full 3D printing automation. This example is built specifically for the Bambu A1, but the same method applies to any printer with Y-axis nozzle movement.
The Modification
Note: This example is specifically for the Bambu A1, but the concepts apply to all printers with Y-axis print head movement. More printer-specific examples will be rolling out in the future.
1. Open Bambu Studio
- Go to Prepare
- Go to Printer Settings

- Find Machine end G-code section

4. Locate the end G-code Insertion Point
Find this section in your end G-code:
|
; pull back filament to AMS M620 S255 G1 X267 F15000 T255 G1 X-28.5 F18000 G1 X-48.2 F3000 G1 X-28.5 F18000 G1 X-48.2 F3000 M621 S255 |
5. Add the Bed Clearing Code
Insert this immediately AFTER the M621 S255 line:
|
; === BED SCRAPING SEQUENCE === G90 ; ensure absolute positioning G1 X128 Y256 F18000 ; move to center-back of bed (128 is middle of 256mm bed) G1 Z0.5 F900 ; lower close to bed surface G1 Y10 F6000 ; SWEEP forward to clear any remaining material G1 Z10 F900 ; raise nozzle G1 Y256 F18000 ; return to back G1 X-13.0 F18000 ; return to safe position ; === END SCRAPING === |
Testing & Usage
First Test:
-
Print a small, cheap part (Example Code For Download: Auto_Eject_Vase.3mf)
-
Watch the clearing sequence to ensure it works
-
Adjust if needed
Next Steps
Dialing It In
The code above provides a solid starting point, but you'll likely need to adjust the values for your specific parts and setup. Every printer and part geometry is different, so expect to fine-tune:
-
Z-heights - Adjust the percentage based on your part size and shape
-
Y-positions - Modify to match your build area dimensions
-
Push speed - Tune for reliable clearing without jamming
-
Number of sweeps - Some setups may need 3-4 sweeps instead of 2
-
X-position (centering) - This setup sweeps at X128 (center of bed). If your prints are offset to one side, you may need to adjust the X value to align with where your parts actually sit
Pro Tips
Tilt Your Printer
Consider tilting your printer slightly forward (raising the back by 1-2 inches). This creates a downward slope that helps parts slide off more easily after being pushed. Gravity becomes your friend, reducing the chances of parts landing back on the build surface.
Add Scraper to Print Head
Adding a scraper can help your print knock everything off the bed more consistently, it can be downloaded here.


)