


Overview
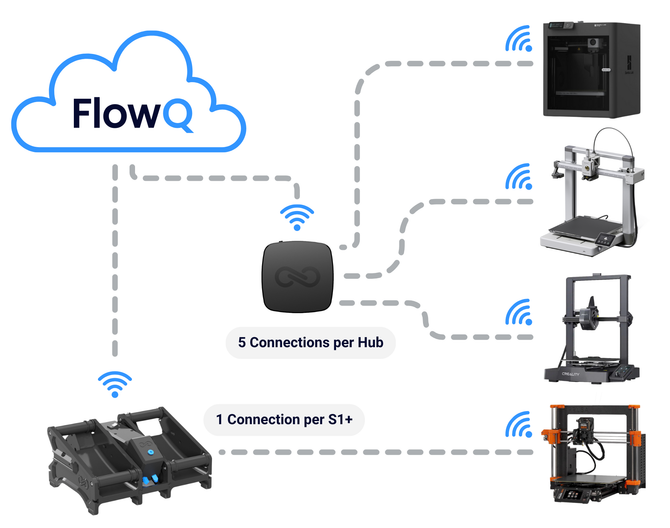
The FlowQ print queue is a centralized system used to organize, schedule, and automate print jobs across an entire 3D printer farm. It allows you to manage all print files in one place, route them intelligently to the correct printers, and automate production for setups that include bed-clearing systems. The print queue is designed to keep printers running continuously by assigning jobs as soon as compatible printers become available.
How Jobs Are Routed to Printers
When a printer is marked as Ready, FlowQ immediately scans the print queue to look for any jobs that match the printer’s capabilities. FlowQ starts at the top of the queue and works downward until it finds a compatible file. The first matching job is automatically assigned to the printer.
A job will only be assigned if the following settings match between the printer and file:
-
- ✅ Nozzle diameter
- ✅ Printer make and model
- ✅ Filament profile(s)
The printer must also be:
-
- ✅ Online & connected to a tunnel
- ✅ Marked as Ready
If no matching jobs are available and the printer is ready to print, it will continue checking the queue every 10 seconds until a compatible job appears.
You can adjust priority at any time by dragging jobs up or down in the queue or by using the arrow buttons on each job row to send the job to the top or bottom of the queue.

Multicolor & AMS Routing
Bambu printers with an AMS support advanced filament routing and automatic AMS mapping.
-
- Any Bambu printer can accept single or multi-color prints as long as all required filaments are loaded on the machine.
- Filament order does not need to match.
- FlowQ automatically maps filaments to the correct AMS slots at print time.
- Supports single-color and multi-color prints, up to 16 colors/materials.

All supported printers support multicolor printing with direct filament mapping.
-
- Multicolor files can be routed as long as the count, order, and material types match exactly between the file and printer settings.
- Filaments are mapped directly.
- Print files are not remapped or modified.

Print Looping
Print looping allows you to automate repeated prints without manually re-adding files to the queue.
When creating a job, you can choose how many times it should repeat or set it to loop indefinitely.
Looping options include:
-
- 🔁 Number of repetitions — The job prints a set number of times.
- ♾️ Infinite looping — The job repeats indefinitely until removed from the queue.
- 📌 Sticky mode — The job stays at the top of the queue until all repetitions are completed.
- ❌📌Non-sticky mode — After each repetition, the job goes to the bottom of the queue and cycles naturally with other jobs.
Jobs with multiple repetitions will begin on multiple printers simultaneously if more than one printer matches the job’s requirements.

Looping Use Cases:
Printing by Order
Situation 1: Print 5 identical parts quickly for a priority order.
Settings:
-
-
-
-
-
- Repetitions: 5 🔁
- Looping Mode: Sticky
-
-
-
-
Result: All five parts are completed before any lower-priority jobs. Printers matching the file settings will start simultaneously.
Mass Production of Multiple Prints
Situation 2: You want the same set of files to print continuously on repeat without manual management.
Settings:
-
-
-
-
-
- Repetitions: Infinite ♾️
- Looping Mode: Non-Sticky
-
-
-
-
Result: Printers cycle through the list of files in order, repeating them endlessly. After a file finishes, it moves to the end of the queue and will start again once the other files have run. This creates a continuous, balanced production loop (this is the setup used in our own print farm).
Mass Production of a Single Print
Situation 3: You want every compatible printer running the same part nonstop until production ends.
Settings:
-
-
-
-
-
- Repetitions: Infinite ♾️
- Looping Mode: Sticky
-
-
-
-
Result: All matching printers run the same file continuously until the job is removed from the queue.
Filling Idle Time With Filler Jobs
Situation: You want printers to run filler jobs whenever higher-priority workloads aren’t available.
Filler Job Settings:
-
-
-
-
-
- Repetitions: Infinite ♾️ (or high number) for filler jobs
- Looping Mode: Non-Sticky
-
-
-
-
High-Priority Job Settings:
-
-
-
-
-
- Repetitions: Finite Number 🔁
- Looping Mode: Sticky
-
Send to top of Queue
-
-
-
-
Result: Printers finish all priority jobs and then work through filler jobs one at a time until more priority jobs become available.
Auto-Restart
When auto-restart is enabled, FlowQ will automatically mark the printer as ready after the print completes, allowing it to pull the next compatible job from the queue without manual input.
This feature can only be enabled if the print file is marked as containing auto-ejection G-code.

FlowQ does not add or modify ejection code, but any print file with auto-ejection commands already embedded can be uploaded to FlowQ. Auto-ejection G-code can be added to your print file in a few ways:
-
-
Add it directly in your slicer start & end G-code
- Insert ejection commands into your slicer’s start or end G-code blocks.
- Keep automation logic inside your normal slicing workflow.
-
Save auto-ejection as a custom profile to be used later.
-
Use third-party automation tools (FarmLoop, Swaplist by Swap Mod, Jobox, etc.)
- These tools can inject ejection sequences into your files and make them available to download.
- Perfect for printers running any of these systems.
-
Add it directly in your slicer start & end G-code
Testing a new Auto-ejection System
When testing a new auto-ejection setup, it is recommended to leave auto-restart disabled until you confirm the system works reliably.
Instead:
1. Turn on email notifications in FlowQ so you are alerted when each print finishes.
2. When you receive a notification, verify the print has cleared successfully. You can do this by checking:
-
-
-
- Your printer’s camera feed (if available), or
- The printer directly in person.
-
-
3. Once you have confirmed your auto-ejection system is dependable and clears reliably, you can enable auto-restart to fully automate your workflow.
Adding Jobs to the Print Queue
-
Go to the Print Files tab inside the Print Queue page in FlowQ.

-
Select any prints you want to add, then click the Add to Queue button at the top of the page.

-
Set your job settings for each print job, including repetitions, looping mode (if applicable), and auto-restart (if applicable).

4. If needed, reorder jobs on the Queue tab by dragging them into the correct position or using the arrow buttons to send a job to the top or bottom of the queue.
